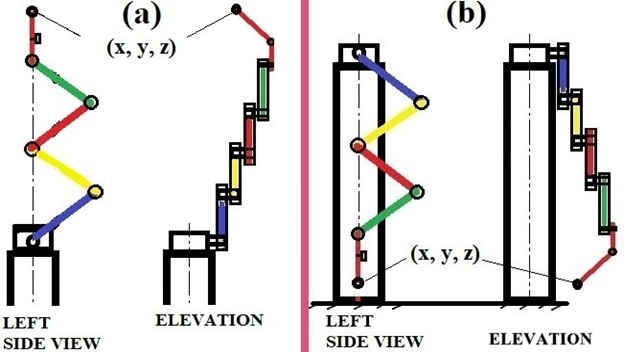
In the last few decades, Robots moved from fantasy movies into real-world applications. Many amazing ideas for human-like robots appearing every day but, the robot arms attracted the engineer's attention for their wide range of applications in the manufacturing and other industrial requirements. Many factors must be carefully considered when designing a robot arm such as the geometry and size of the required workspace, the environmental conditions of its workspace (physical, thermal chemical …etc.). Between these various factors, the most challenging one is the inverse kinematics that relates the desired motion and orientation of the end-effector to its joint displacements.
Review of previous work
To achieve a successful robot arm design, it is mandatory to review the previous trials of the other researchers to make use of their advantages and to treat the gaps in their work. Some designers built their robots and depended on the sensors more than the calculations when moving the end-effector to the desired position. Glaufe et al.,1 developed a PID control system for a robotic arm with a computer vision system to capture objects. Its movements are limited to 6 possible positions depending on the color. Their lowest percentage of catches among all positions was 83.33%. Mohamed G et al.,2 used the topology optimization technique to obtain an optimal robot arm design from both structure and control viewpoints. They used (MMA) method as an optimization algorithm with a time-optimal control method to gain a design that ensures a minimum traveling time. They reported that the traveling time is reduced by 44.8%. Another category of the design concept is to control the robot arm by signals that transfer through the internet. Aishwarya et al.,3 tried to design autonomous robot systems wherein which, each device is uniquely identifiable by a controlling software which is the core concept of the Internet of Things. Their idea is to imitate the human hand movement with a virtually controlled robotic arm they used a video and audio interface plug-in to recognize audio commands and also video gestures. Sundari et al.,4 suggested a robotic arm using the Internet of things at a low cost. Their arm has controlled by a wireless technique by an authorized person at any time and from any place. They made a setup on the hardware side of their Robotic Arm to receive the client control signals. Swamardika et al.,5 designed a prototype of a mobile robot with an arm. They controlled it by wireless technology.
It has 6 wheels and 6 Degree of Freedom. The signals to this robot are sent serially via XBee transmitter and then, are processed on the receiver. Rajashekar et al.,6 designed a robot arm that is controlled by a remote user by an android application via a Bluetooth module connected to an Arduino and has 4 degrees of freedom. Rahman et al.,7 implemented and successfully tested an ASR K-250 robot that has 4 degrees of freedom arm. They considered the mechanical structure and construction of a humanoid robot arm without considering its dynamical analysis. The exact position and orientation of its arm depended on three joints. Ali et al.,8 introduced an idea for the design of the robot passive universal gripper that includes a mass of granular material enclosed in an elastic membrane. By the use of a combination of positive and negative pressure, the gripper can rapidly grip and release any item. This gripper passively takes the form of a target and the positive pressure reverses this action and enables a fast ejection of objects. Jadeja et al.,9 designed controlled a robotic arm by using Cortex ARM M3 LPC1768 Microcontroller. This arm has 5 Degrees of Freedom. It can work in hazardous circumstances and could be updated and modified easily. Their design could be modified in future work to be controlled by disabled people Jain et al.,10 modeled and analyzed an articulated robotic arm using Solid works and ANSYS software. Their structural analysis was successfully verified and they recommended the usage of their arm in the hazardous area in industries. Khosla et al.,11 tried to overcome the real-time problems in their designed robot. It is controlled by wireless communication with less hassle and with an easy-used GUI. It could distinguish the different objects and the way each one will be processed. Elfasakhany et al.,12 designed and implemented a robot arm with four degrees of freedom. Their arm could be integrated into a mobile platform in the industrial workforce. They equipped all servo motors with encoders to avoid the need to angle control. The inverse kinematic calculations and communications were done by Lab view connected serially to a microcontroller.
Bugday et al.,13 considered the required torques when the extending reach length and payload increase. They analyzed five different robotic arms and investigated the arm’s payload distribution. They changed Geometry and materials in alternative designs to minimize the redundant weight with the same positioning precision. They reported a 10% decrease in inert payloads. Reviewing the previous work mentioned above, we found that the majority of these trials depend on the control schemes rather than the inverse kinematics in positioning the arm and orienting the end- effecter. But other researchers had the same goals as that of the present work, for example; Clothier et al.,14 developed a geometric approach to estimate the joint angles for the arm positioning in the three-dimensional space. They used the trigonometric approach for the represented geometry of the arm. They tested their arm in a mobile robot platform. Their arm contained five degrees of freedom in addition to an end-effector. Oluwajobi et al.,15 designed and developed a 5-DoF (Degree of Freedom) robotic arm for educational purposes. They simulated the robotic arm by using the Matlab Robotics Toolbox, to visualize the joint movements and developed control software to control their robotic arm. This software can position the end-effector to any specified coordinates in space. Bi16 developed an optimized control algorithm containing a fuzzy algorithm based on the error rate adjustment P, I, D value model that depends on symmetry principles. For a two-degree-of-freedom (2-DOF) manipulator. He established a mathematical model of a 2-DOF which relates the input driving force and the output rotation angle. Next, he designed a set of trajectory planning algorithms by using gradient model control to predict the end-effector trajectory.
Objectives of the present work
From the review of the previous work, we observe that some designs are complicated and could be applied when certain conditions are available. In other designs, the motion depends mainly on sensing the environment. Other designs have low degrees of freedom but work according to complicated mathematics. In the present work, we suggest a simple robot arm design that has the following features;
- Simple low-cost design
- The grabber (or tool) of its end-effector can access any point in a spherical workspace whose center is
- The origin of the base frame.
- While the arm moves, it sweeps smaller volumes in the workspace to avoid collisions with obstacles.
- It depends on simpler inverse kinematics in the positioning and orientation of its end-effector.
The suggested design
It is required to suggest a technique that can move the end-effector tool end-tip to a required position, (X, Y, Z), and rotate the tool to a required angle relative to the plane Y-Z. The designed arm executes this prescribed motion, through eight joints, and this is executed by estimating the angle values as functions of the coordinates, (X, Y, Z), of the tool end-tip of the end-effector. All the coordinates and angles are assigned relative to the base frame, (frame 0) Figures 1–5.
The suggested design can position the starting point of the end-effector, (the midpoint of the thickness of link L6 at joint ‘J6’, point ‘E’,) to a position that allows the tool end-tip to arrive at the required position with a predetermined inclination on the vertical plane, Y-Z. In future work, the design may be modified to allow the tool to be inclined on two planes with two predetermined angles. As illustrated in Figures 1– 4, the geometry could be described as follows; a fixed frame, (frame 0 of link 0) that carries link 1. Link 1 rotates about a vertical axis by joint J1and carries four identical links; L2, L3, L4, and L5). Between every two adjacent links, there is a revolute joint, joints J2, J3, J4, J5. The side of L2 is offset from the vertical axis of link 1 by a radius (r), Figure 4. A revolute joint, (J 5) connects L5 to L6. Another revolute joint, (J6) connects L6 to L7. The axes of joints J6 and J7 are mutually perpendicular. A prismatic joint, J8, connects L7 to L8, which may be a grabber mechanism or a manufacturing tool. If it is equipped with grabbers, these grabbers are operated by a gearing system, Figure 6. The prismatic joint is useful when there are space constraints around the goal. Also, it is useful in case, if it is desired to access the narrow region of the corner between the ground and link 1. All the revolute and prismatic joints are shown in Figures 2,3,6 and they are actuated by servo DC motors. The suggested arm can access any point, (x, y, z), in a spherical region whose center, (O), is the intersection of the axes of frame ‘0’, or frame ‘1’. The only region that is inaccessible is the volume occupied by the link L1 which is defined by (x2+y2 ⇐w, and z > t/2 and ), where‘t’ is the thickness of any one of the links, (L2-L6). Figure 7 illustrates the different positions in the workspace of the arm.
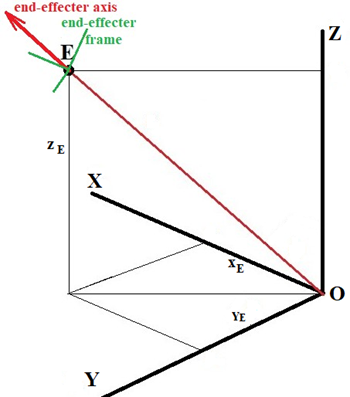
Figure 1 Defining the position of the point, (E), (mid-point of joint J6) in frame 0.
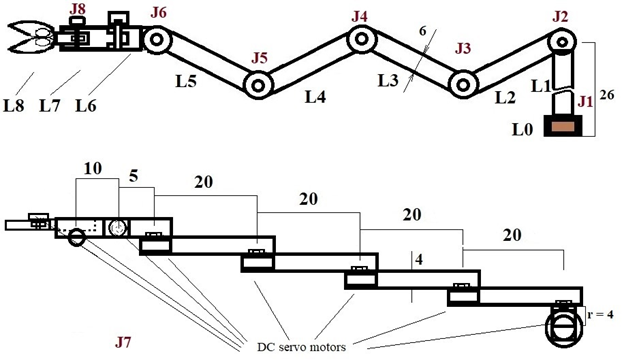
Figure 2 The main features and dimensions, (in cm) of the arm installation.
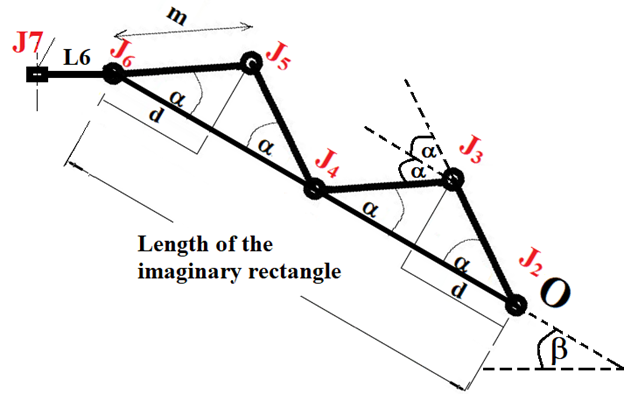
Figure 3 The orientations of the arm links when it is contracted.
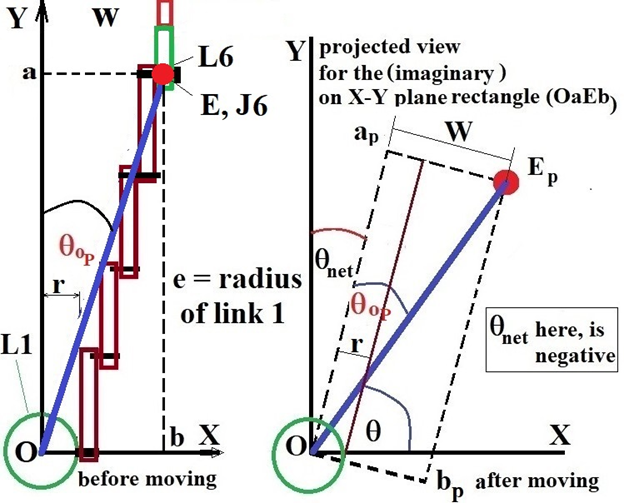
Figure 4 A top views for the arm before and after motion.
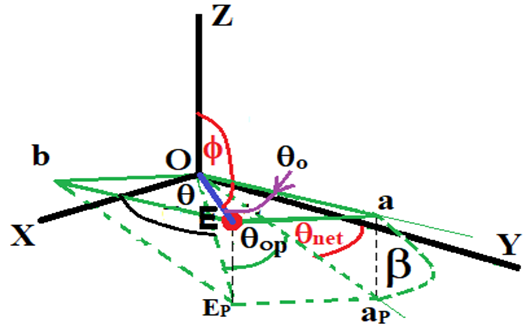
Figure 5 Illustration of the arm after rotating link 1 by an angle θnet and link 2 by angle β.
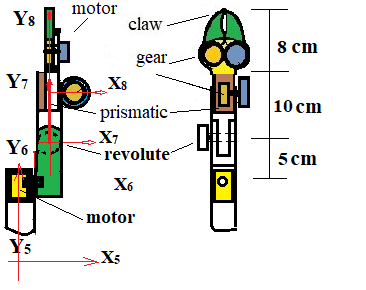
Figure 6 Details of the grabber configuration, links (6 to 8).
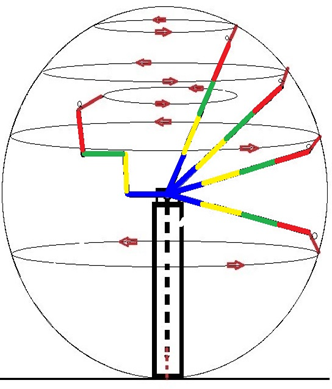
Figure 7 The different positions in the workspace of the arm.
The inverse kinematics equations
The technique of positioning and orientation of the end-effector depends on the transformation of the Cartesian coordinates into spherical coordinates then, we can deduce the joints displacements. To make the following analysis more clear, we first consider the arm when it is stretched to its maximum length, (and lies in the plane X-Y), and draw an imaginary rectangle, (O a E b) as shown in Figure 4. Its length (Oa) equals the sum of lengths of links (2 to 5) and its width equals the width of the four links, (L2, L3, L4, and L5), plus the radius of link L1 and half the width of link L6, Figures 3–5. The axis of joint 1 passes by the origin of frame 1 which coincide with the origin of frame ‘0’ and the position of the midpoint of the thickness of link L6 at joint ‘J6’, (point ‘E’), is defined in frame ‘0’ by the coordinates, (XE, YE, ZE).
Notes
- (E) Is the origin of frame 6?
- To rotate the end-effector tool, (L7+L8), at the desired angle, τ, with plane Y-Z, it is easier to keep link 6 in a horizontal position; that means after rotating links L2, L3, L4, and L5, link L6 should rotate at an angle –(β)
- θnet is the rotation angle of the joint (J1) relative to plane Y-Z
-
is between (O EP) and ( O aP), Figure 5
- According to equation (4)
has always a positive value
- β is the rotation angle of joint (J2) relative to plane X-Y
- α, Figure 3, is the angle between any one of links L2, L3, L4, and L5 relative to the imaginary rectangle (O a E b), Figures 3,4.
- The rectangle (O ap E bp) is the projected view of the rectangle (O a E b) on the X-Y plane
- To ensure that, the angle of inclination between the end-effector and the Y-Z plane equals (τ), joint J7 should rotate by a value that equals
- Before the first arm movement, the initial directions of links, L2, L3, L4, L5, and L6 are vertical, (parallel to Z-axis).
Now, consider the case when we need to position the tool end-tip at a predetermined point, (X, Y, Z) such that, the end-effector tool should make the desired angle, (τ), with the plane Y-Z. Reviewing Figures 3–5; the controller will rotate link 1 by an angle (θnet) and rotate the link 2 by an angle (β). Finally, the total arm length should be reduced to the length (O a) by rotating joint, J2, again by an angle (
) and rotating joints J3, J4, and J5 by angle values, (
), (
), and (
), respectively. Joint J6 rotates by an angle –
to stay in a horizontal position, as mentioned before. These movements will allow point (E) to arrive at position (XE, YE, ZE) which is related to the required position (X, Y, Z) as will be shown in the following section.
The relations between the tool end-tip destination, (X, Y, Z) and (
)
After executing any movement, (except the special positions that will be explained later), the link L6 will be horizontal, and the end-effector tool, (L7+L8), should make a predefined angle, (τ), with Y-Z plane where,
following the angle sign convention;
(1a)
(1b)
(1c)
The length of OE defined in frame 0 is;
(2)
To estimate the first required angle,
for any position of the end-effector (E), we notice from the situation shown in Figure 4 that, according to the sign conventions,
is negative,
is positive, and
is positive;
(3)
(4)
(5)
(6)
(7)
(8)
The joint, J2, will first, rotate at an angle,
, which is calculated from;
(9)
(10)
When the arms contracts to length (O a), α is estimated from;
(11)
Notes
-
-
-
- Joint 2, first, rotates by an angle β, then, rotates by an angle α, but the other three joints, 3 to 5rotate at angles that equal +2α, -2α, and +2α, respectively, as seen from Figure 3.
- The old values of (θnet, β and α) are subtracted from the newly calculated values to get the corresponding net values which will be executed by the actuators.
The speeds of joints
Now, if the motion of point (E) is prescribed by
then, the corresponding speeds of (θnet, β and α) are estimated as follows;
From equation (2);
(12)
From equation (6);
(13)
From equation (4)
(14)
From equation (7);
(15)
To estimate θnet from equation (3);
(16)
From equations (8);
(17)
From equations (9);
(18)
From equation (11);
(19)
Special regions
Before operating the arm, all angles (θnet, β α and
) are set at zero values
- When the controller is fed by position coordinates that satisfy the conditions
(x2+y2 ⇐w, and z > t/2), Figure 8a, the following control process is accomplished to settle the grabber or the tool end-tip at this point;
- Link 1 rotates by an angle
- Next, Link 2 first, will rotate by an angle
- Links (2 to 6) will rotate by angle values that equal
respectively, where,
(20)
where;
(21)
(22)
- Finally, link 7 rotates by an angle that equals
- When the controller is fed by position coordinates that satisfy the conditions
(x2+y2 ⇐w, and z < -t/2), Figure 8b, the following procedure is followed;
- Link 1 rotates by an angle
- Next, Link 2 first, will rotate by an angle
- Links (2 to 6) will rotate by angle values that equal
respectively, where,
(23)

Figure 8 Positioning the tool end-tip at a point (x, y, z);
a) (x2+y2 ⇐w, and z > t/2)
b) (x2+y2 ⇐w, and z < -t/2)
c) Singularity region when the controller is fed by position coordinates that satisfy the conditions (x=y=0, and z > t/2), Link 2 first, will rotate by an angle β=90℃. Next, steps (c) and (d) of case (1) are followed, (in this case xy =0).
- Finally, link 7 rotates by an angle,
, where
(24)
Notes
- For this case,
where ‘r’ is the radius of link L1
- zz is calculated from Equation (21).
- And again, the executed values of (θnet, β α and ) are the differences between the newly
- Calculated values and the old values.
Dealing with obstacles
In many applications, the workspace is expected to contain some obstacles, and so, each one of the links, L2, L3, L4, L5, L6, and L7 is equipped with a proximity sensor. If an obstacle is detected by one of the sensors attached to (L2-L5), the controller, first, stops the arm and stores the current values of ( α, θ and β) and tries to avoid the arm obstacle as follows;
- To rotate the joints J2, J3, J4, J5, and J6 with new values that equal the old values as shown in Figure 9, case (1), but with reversed signs as shown in case (2)
- If the obstacle is still detected by any of the sensors of L3 or L4, joints J3, J4, and J5 will rotate by values, 2α and -4α, respectively. Figure 9, cases (3), and (4).
- During the rotation of joint J1, if the obstacle is detected by any of the sensors, (L6 and L7), the arm stops, and joint J2 keeps rotating with a positive value until the sensors miss the obstacle. Next, J2 stops and the controller stores the swept angle of J2, and joint J1 is rotated by the predetermined value, (θnet), and then, J2 is again rotated by the stored value but in the reversed direction.
- In case (3), if J2 is rotated by the maximum angle value and the obstacle could not be missed, J2 rotates in the opposite direction by the same angle value and keeps rotating until the sensors miss the obstacle and continue the described procedure.
- If the obstacle is detected by any of the sensors (L6 and L7) during the rotation of joint J2 the same procedure that is described in (3) and (4) is followed but with swapping the roles of the joints J1 and J2.
- If the obstacle is still detected by any of the sensors of (L2- L7), joint J2 will rotate by a value that equals (- the current value of θ) -
- If the obstacle is still detected by any of the sensors of (L2- L7), joint J1 will rotate by a value that equals (- the current value of β) -
- If the obstacle is still detected by any of the sensors of (L2 – L7), the arm returns to the initial position, and then, the sequence of the executions of the three angles, are changed, (β θ, and α), (α, β, θ and )… etc. until no obstacle is detected.
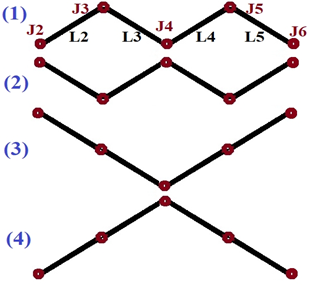
Figure 9 Two trials of avoiding an obstacle.
In all the above cases, the executed angle values are the differences between the new values and the stored values.
Simple model
To test the suggested technique, a simple model is built according to the details shown in Figures 2–4,6 by using an aluminum alloy. From the figures, it is obvious that we need to connect many wires to supply the different actuators with power and control signals. It is important to pass these wires in paths that save them from damages by rubbing, collisions, or hanging with any entities during the arm motion. Also, these paths should not hinder the arm motion. One suggestion is to pass the wires inside the links and through the links axles as shown in Figure 10. From the figure, it is observed that there is excessive wire length to allow the expected wire pulling during the links rotations. This suggested path is applied to joints, J2- to J6 only, but the expected movements of joint J7 will not be hindered by the wires if they were without isolating path. Since the maximum expected rotation angle for any link is less than 180, the maximum excess in the wire length must be larger than (N x
x d), where, ‘N’ is the number of considered joints, (5 in this case) and ‘d’ is the joint axle radius plus the wire bundle diameter. Also, the top surfaces of the hollow axles are removed, and a suitable number of openings are cut in each arm to facilitate the wire passing process. The axle holes' positions and diameters are carefully chosen with suitable lubricants that ensure fluent wire sliding.
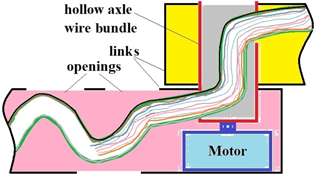
Figure 10 The suggested wire bundle passage.
To check the suggested design, the following procedure is repeated for different specified positions;
– Feed the controller with the coordinates of the required position for the tool end-tip, and its angle of inclination on the X-Y plane.
– A manual 3-D traverse mechanism is adjusted to position a small needle tip at the required destination point.
– Execute the arm movement.
– Alter the traverse mechanism to position the needle tip at the tool end-tip.
– Register the differences in coordinates of the required and actual positions of the tool end-tip
– To measure the percentage of deviation in the inclination angle of the end-effector,
%, we position the needle tip at the tool end-tip and joint J6, and from the differences in its coordinates we calculate the actual inclination angle,
, from;
(25)
- a simple design and a mathematical model are suggested for a robot arm, whose workspace is a spherical region.
- The arm has nine links and eight joints.
- These suggested architecture and mathematical model helped to formulate the inverse kinematics of the positioning and orientation of the end-effector using four parameters that are functions of the coordinates (x, y, z) of the required destination of the tool end-tip
- The suggested design can deal with obstacles and singularity points.
- A simple model for the arm was built to check the reliability of the design. The arm could execute the instructions of end-effector movements and orientations
- The results showed that the accuracy of motion in the four DOF ranged from 92% to 98%,
- The inaccuracy in results may be because of the low resolutions of the used stepper motors.
- For future work, this arm will be redesigned considering the load distribution as well as the motion. Also, more advanced components should be used to improve motion accuracy.
Nomenclature
Alphabetic
a vertex of the imaginary rectangle surrounding the arm
b another vertex of the imaginary rectangle surrounding the arm
E the midpoint of the thickness of link L6 at joint ‘J6’, Figure 4.
J joint
L link
m length of any one of links 2, 3, 4, and 5 Figure 2.
O the origin of frames 0 and 1, Figure 4.
Oa the projected length of links L2, L3, L4, L5 on plane X-Y Figure 2.
r the radius of link 1, Figure 4.
t thickness of any one of the links (2-5), Figure 2.
w width of the four arm links together plus the base radius, (r), and half the width of link (L6), Figure 4.
XE, YE, ZE coordinates of point E, defined in frame 0.
X, Y, Z coordinates of the tool end-tip defined in frame 0.
Greek symbols
α angle between two adjacent arms.
β angle between the arm side and the Z-axis
ε inclination angle of the end-effector tool on X-Y plane
θ angle between the arm and the X-axis.
θnet the net angle rotated by the arm in the X-Y plane
the angle between the projections of the line (O a) and (OE) on plane X-Y.
Φ the angle between the position vector of (E) and the Z-axis
τ the desired angle between the end-effector tool and the Y-Z plane
Subscripts
0, 8 indices of the joints and links
p projected on the X-Y plane


