eISSN: 2574-9927


Research Article Volume 1 Issue 4
Department of Metallurgical Engineering, National Institute of Technology, India
Correspondence: Shailesh Tiwari, Department of Metallurgical Engineering, National Institute of Technology, India
Received: September 01, 2017 | Published: December 19, 2017
Citation: Tiwari S, Chopkar MK. Fracture analysis of high strain rate torsion samples of aluminium zinc magnesium copper alloy. Material Sci & Eng Int J. 2017;1(4):142-145. DOI: 10.15406/mseij.2017.01.00023
Aluminium alloy 7075-T651 was subjected to Torsional Split Hopkinson Bar. A Hollow thin wall cylindrical samples were twisted with an instant release of bar with stored toque generating strain rate in the range of 730s-1 to 2041s-1. Few samples failed around highest strain rate in the range of 2041s-1. A hollow thin wall cylindrical sample failing under high strain torsion revealed a range of failure from brittle to ductile owing to material behaving differently at different strain rates along the circumference of fracture. Brittle failure at high strain rates were typically flat with sheared precipitates and intermetallic inclusions. Ductile failure showed elongated oval dimples typical of shear fracture and bypassed precipitates and intermetallic inclusions. Sample bending, crack splitting and crack diversion was also observed.
Keywords: fractography, high strain rate, aluminum alloy, split hopkinson torsion bar, AA7075–T651
All materials have been historically tested at static loading conditions. With the advent of technology, the study of behaviour of materials at high strain rate was done using various methods. The principle of split Hopkinson bar was used to study high strain rate of material in the range of 102s-1 to 103s-1. Split Hopkinson bars were designed for all three modes of deformation and extensively used for compression and tension studies.1–8 Owing to the difficulty of complications involved in making the Split Hopkinson torsion bar setup and the difficulties in making standard torsion sample, very few study in high strain torsion have been done so far.
The 7xxx series aluminum alloys have found widespread use in the aerospace sector owing to their high strength, which is due to heterogeneous microstructures based on the Al–Zn–Mg–Cu system.9 Aluminum alloy 7075 is an aerospace grade of aluminum which has very high strength to weight ratio and corrosion resistance and is used for highly stressed structural parts. The temper studied here is 7075-T7651, which possesses better strength and corrosion resistance, while maintaining an acceptable resistance to stress corrosion cracking. Some aerospace components may be vulnerable to impact loading in the event of a collision with flying debris or crashing. Hence, an adequate testing of this material at high strain rates is desirable. High strain rate deformations (compression and tension) and related microstructure studies have been carried out extensively. However, texture studies at high strain rates and especially under torsion have been seldom done.10 The Torsional Split Hopkinson Bar has been widely used to test various materials including composites, aluminum, stainless steel, and the super alloy Inconel at elevated strain rates.11–15 There is abundant literature available for high strain rate deformation under compression loading, while the same under torsion is scarce.
Therefore, in the present investigation,16 Al-Zn-Mg-Cu alloys, deformed samples tested under torsional split Hopkinson torsional bar used to decipher failure behaviour of at a variety of strain rates ranging from 730 sec-1 to 2041sec-1.
In the present work, the mechanical behavior of Aluminum Alloy 7075-T651 in extruded form was studied under torsion at the strain rate in the range of 730s-1 to 2041s-1. Aluminum alloy 7075-T7651 extruded bars manufactured by Kaiser Aluminum (California, US) and imported by Perfect metals, Bangalore was used as the base metal for the present study. The composition of the alloy was determined from optical emission spectroscopy and reported in (Table 1). Circular bar with 32mm diameter was machined along extrusion direction to produce hexagonal hollow torsion ASTM standard sample as depicted in (Figure 1).
Element |
Si |
Fe |
Cu |
Mn |
Mg |
Cr |
Zn |
Ti |
Al |
Wt% |
0.12 |
0.25 |
1.6 |
0.06 |
2.6 |
0.2 |
5.8 |
0.07 |
Bal. |
Table 1 Composition of the AA7075 T651
The gage section is 3.8mm in length, with an outer wall diameter 13.8mm and inner wall diameter 13.0mm resulting in intended wall thickness of 0.4mm. These samples were twisted to 4°, 10° and 16° which give rise to different strain rates. Required data were obtained with the help of Oscilloscope by mounting strain gages at incident and transmitted bar.
Materials fail differently depending on the type of loading and depending on the way load is applied. Fracture happens when the stress applied reaches the fracture strength of the material. The fracture strength of the material is lower than the ultimate tensile strength (UTS) while for brittle material it is equal to the ultimate tensile strength. Fracture happens though crack initiation and propagation. Mode of fracture is governed by the manner by which the crack propagates through the material. Ductile fracture has the crack moving slowly and is involves large amount of plastic deformation around the crack tip. The crack extends with an increased stress in the material. Cracks propagate very rapidly with very little or no plastic deformation in brittle fracture. These cracks continue to grow and increase in magnitude once they are initiated.
Fracture
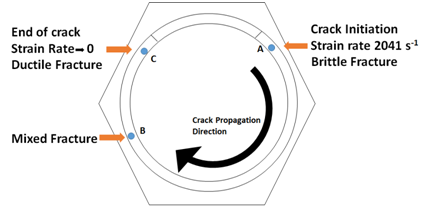
A split Hopkinson torsion bar tested and failed sample exhibits a unique fracture mode which covers almost all stages of fracture starting from brittle fracture due to high strain rates and gradually transitioning to ductile failure towards the end of the fracture when the strain rate dies down to a zero value (Figure 2). The sample analysed was subjected to highest strain rate of 2041s-1 and showed a nominal bend from the axis of sample.

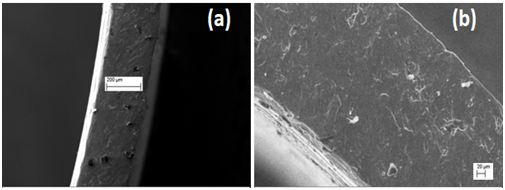
Brittle fracture: The external factors affecting the behaviour of the material under strain is the strain rate and direction of the strain with respect to the sample. In high strain rate shear experiments samples show brittle failure. The unique geometry of sample of split Hopkinson torsion bar displays variety of fractured surface on a sample. Precipitates and defects present in the material act as a void nucleation site. These void nucleation sites initiate the crack on application of stress. When the crack initiates from any of the defects at site ‘A’, it propagates at faster rate due to high strain rate. The type of fracture surface it generates is flat brittle type as shown in Figure 3.

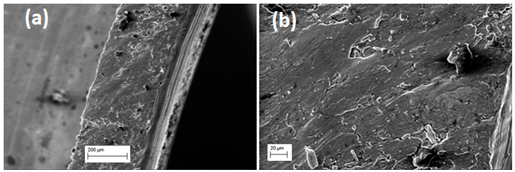
Ductile fracture: In high strain rate torsion testing, the stored torque is released once and there is no continuous application as in static testing. As the crack propagates, the strain rate is dying down eventually heading to zero value. At lower strain rates towards the end, the material behaves as ductile and the fracture surface shows the stretchy rough surface as both hexagonal grips of sample pull apart (Figure 4). The crack here shows oval dimple fracture typical of shear failure and at higher magnification shows conical dimples of small and medium size. The crack propagation is slower in this part of the fracture thus giving time for plastic deformation.

Mixed fracture: The crack initiates and propagates from a high strain rate point till the strain rate dies down to zero and reflects in the opposite direction. Between the start where the material behaves as brittle and the end where the material behaves as ductile, there is a transition region where mixes of both types of failure are observed (Figure 5). Here a mix of flat brittles types zones and rough ductile type zones with oval dimples are observed. Many areas show faint characteristics of quasi-cleavage. There are the areas where the strain rate is not high enough to produce pure brittle fracture and not low enough to effect a complete ductile failure.

Sample bending
(Figure 6) shows the images of different samples. At high strain rate when the sample starts to fail, the axis of the hollow cylindrical sample is intact and is in alignment with axis of torsion. However, as the crack propagates the axis of two sides of the sample start to shift away from the torsion axis. At highest strain rate when the material fails more (but not completely) in a brittle way, the shift in the axis is not much Figure 6. The sample failing at slightly lesser strain rate and showing more ductile type failure exhibit significant bending of the sample. The sample twisted at 14 degree showed a bending of 220 from original axis Figure 6.
The length of the crack for sample failing at smaller strain rate is lesser as the strain rate dies down earlier. This gives more time for plastic deformation towards the end and that combined with shift in axis gives more bending to the sample. At highest strain rate the crack propagated to the longest path of the circumference and the fracture was brittle for most part of it. This caused less shift of axis and thus less bending.

Other observations
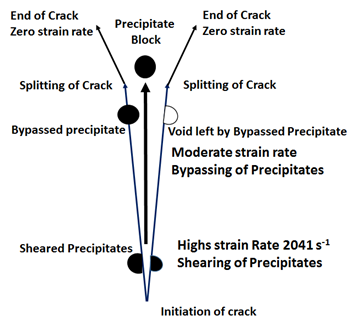
Sheared precipitates and intermetallic inclusions: Various broken and sheared precipitated were there in the entire sample’s fracture surface. The behaviour of the precipitates lying on the fractures path depends on the topography of the precipitates. The location of the precipitates with respect to the fracture plane and the shear stress applies at that location affects the outcome of the interaction of the crack with the precipitates (Figure 7).

It is evident from Figure 8 that some precipitates and intermetallic inclusions sheared into two showing a flat surface as the fracture surface. These were the precipitates subjected to high shear and were well gripped on both sides of the fracture plane. Some precipitates did not shear and show as protrusions in the fractured surface. These precipitates had firm grip on one side of the fracture plane and remained on that side leaving a groove on the other side.

Crack splitting and crack diversion: The crack towards the end showed splitting for the sample strained at highest strain rate of 2041s-1 (Figure 9). This can be either due to the high crack encountering any obstacle in its path or even the slightest shift of axis causing the crack to split. This could also be the combination of both the effects. The sample failing at lower strain rate and showing a bend of 220 also depicted diversion of the crack (Figure 9). This diversion in the crack is in an effort to align the crack direction towards the new severely shifted axis of the sample.
Following are the observations from the comprehensive fractography study:
None.
The author declares no conflict of interest.

©2017 Tiwari, et al. This is an open access article distributed under the terms of the, which permits unrestricted use, distribution, and build upon your work non-commercially.