MOJ
eISSN: 2572-8520


Review Article Volume 5 Issue 3
1Department of Mechanical Engineering, Invertis University, India
2Department of Applied Mechanics, Motilal Nehru National Institute of Technology Allahabad, Prayagraj, India
Correspondence: Ajitanshu Vedrtnam, Department of Applied Mechanics, Motilal Nehru National Institute of Technology Allahabad, Prayagraj, UP, India
Received: November 05, 2019 | Published: November 30, 2019
Citation: Vedrtnam A, Chaturvedi SK. Optimizing machining processes used for high chromium steel. MOJ Civil Eng. 2019;5(3):68-76. DOI: 10.15406/mojce.2019.05.00158
End milling (EM) and electric discharge machining (EDM) are frequently used for machining high chromium steel. The superior surface finish is among the key requirements for the improved functional behavior, wear resistance, and fatigue life high chromium steel components. The present work includes optimization of EM (using Taguchi method) and EDM processes (by selecting appropriate electrode) for machining of the high chromium steel keeping high material removal rate (MRR) and superior surface finish as the objectives. Additionally, the effect of coolant on surface roughness was evaluated. For EM, the feed rate was found the most influential parameter and the high spindle speed, small feed rate result‒in better surface finish whereas the depth of cut has the insignificant effect on the surface roughness for the selected rages of process parameters. The scanning electron microscope (SEM) micrographs revealed that flood cooling decreases the surface defects and mostly high chromium steel samples were having a lower surface roughness when coolant was used. For EDM, the brass electrode results in a superior surface finish but a lesser MRR than the copper electrode while machining high chromium steel.
Keywords: end milling, EDM, chromium steel, taguchi, optimization
EM and EDM are the most commonly used convectional and unconventional processes respectively for machining high chromium steel components. The high chromium steel is used in machine parts that require corrosion, wear and thermal (range of 800°C and above) resistance such as ball and roller bearings, beading rolls, spinning tools, punches and dies, brake, cylindrical, conical and needle rollers. The objective of present study was to optimize mostly used machining operations for the high chromium steel components; thus the study was divided in to two part first section was focused on optimizing EM operation followed by optimization of EDM process.
In general, the statistical,1‒3 unconventional methods.4‒7 (neural network,6 fuzzy logic, and genetic algorithm,5) and specialized models.4,7 were utilized in the literature for optimizing the machining processes. The first objective of the present work was to optimize the EM operation for high chromium steel. The EM optimization includes optimal selection of the milling parameters,8 or reduction in force requirement (cutting speed, surface inclination angle) that reduces forces and improve efficiency in finish ball EM of hardened 55NiCrMoV6 steel. Arriaza et al.,9 analyzed a carbide end mill on AISI 1045 steel, using the potential energy approach, the energy limit for a cutting tool was determined for estimation of the tool life and prediction of the tool change timing. Wang & Liu.,10 evaluated the performance of solid ceramic EM tools while machining hardened H13 steel and concluded that Ti(C,N) tools give superior surface finish and longer tool lives. Li et al.,11 have discussed hybrid machining process based on EDM and end milling for STD 11 alloy steel (very hard and difficult‒to‒cut material). Masmiati et al.,12 developed a mathematical model for optimizing EM operation during machining of S50C medium carbon steel with the target of keeping minimum residual stress, cutting force and surface roughness. Mia.,13 performed optimization of EM using response surface methodology, the experimentation included cryogenic cooling (by a through‒tool application) of tool targeting minimum cutting force, surface roughness, and specific cutting energy. Beake et al.,14 have evaluated wear performance of PVD coatings during hard wet EM of H13 tool steel and reported 100% improvement in tool life by the application of the AlCrN‒TiAlN coating. It is clear from the literature review that mostly optimization objectives comprise tool life maximization15 and minimization of tool wear,16 vibrations,17 surface roughness18 and cutting forces19 Lacalle et al.,20 have optimized the tool‒path during EM based on the predicted cutting forces for minimizing the dimensional errors. A parallel approach was projected by Lazoglu et al.,21 for minimizing the cutting forces by tool paths optimization. Gok et al.,22 optimized variable cutting parameters and tool path for the minimum cutting force and tool deflection in the EM of X40CrMoV5‒1 tool steel. Masmiati & Sarhan.,23 applied Taguchi optimization for enhanced surface integrity during EM of S50C steel. Vakondios et al.,24 found that the surface inclination angle has a significant effect while optimizing spindle speed, feed per tooth and depth of cut during EM for Al7075‒T6 alloy. Kuram & Ozcelik.,25 have used Taguchi method for optimizing cutting parameters during micro‒milling of Al 7075 for minimum tool wear, cutting forces and surface roughness. The production rate with an acceptable quality level was the prime concern.
The metal removal in EDM includes a thermal phenomenon in which the thermal energy produced in the plasma channel is utilized for machining the work‒piece. Tamang et al.,26 reported the use of EDM for producing micro‒holes on the hard metal and alloys. The overcut and taper angles were predicted using statistical regression model and Taguchi analysis was used for optimizing the process parameters. Mishra and Routara.27 reported the use of the grey relation analysis and Taguchi approach for optimizing EDM parameters for machining of EN‒24 alloy steel. Dastagiri & Kumar.,28 optimized EDM parameters using full factorial design while machining stainless steel and En41b. The literature review has clearly reflected that the statistical techniques (Taguchi analysis, regression analysis, gray relation analysis, and factorial design) were effectively used for optimizing end milling and EDM processes. The description of these statistical techniques are available in,36‒55 In the present work, the EM and EDM were optimized for the superior surface integrity and high production rate for the high chromium steel samples. Further, an explanation for the improved surface using SEM and optical scan of the machined components was presented. As, EM and EDM utilize completely different mechanisms for material removal, the MRR in EDM is by far lower than the MRR in EM, and the two processes create two different surfaces with different topographies, roughness, and micro‒structures, both methods are discussed separately. The influence of the cutting speed and surface inclination angle on MRR was reported. Further, MRR and micrographs of high chromium steel samples machined using EDM with the brass/copper or graphite electrode were discussed.
Optimization of machining parameters during end milling
Table 1 shows the chemical composition of the high chromium steel. The end mill cutter was having diameter= 8 mm, number of teeth =2, orthogonal rake angle=‒15°, helix angle =30°, cutting edge radius =5µm, orthogonal flank angle=6° and orthogonal wedge angle=99°. Figure 1 shows the EM cutter fitted to the spindle of EM machine and the vice is holding the work‒piece. The monolithic ball EM cutter (made of fine‒grained tungsten carbide with an anti‒wear TiAlN coating) was used during experimentation. Table 2 shows the specifications of CNC Vertical EM Machine (ELEKTRA SPRINTCUT 734) made by Electronic Machine Tools used during experimentation. The experimentation was designed as per the Taguchi method (L9 orthogonal array) for reducing the number of experiments required to determine the optimum conditions. Total nine experimental runs were conducted based on the different combinations of the input parameters. Table 3 shows the machining parameters with their levels used during experimentation. The smaller the better, SNs=−10log(1n∑ni=1Yi2) principle is used for calculating the signal to noise (S/N) ratio.
C |
Mn |
Si |
Cr |
S |
P |
Ni |
Mo |
1.08 |
0.53 |
0.25 |
1.46 |
0.015 |
0.022 |
0.33 |
0.06 |
Table 1 Chemical composition of high chromium steel
Design |
Fixed column, moving table |
Table size |
440 x 650mm |
Work-piece dimensions |
100mm x 20mm x 20mm |
Main table traverse (X,Y) |
300, 400mm |
Auxiliary table traverse (u,v) |
80, 80mm |
Generator |
ELPULS-40 A DLX |
Controlled axes |
X Y, U, V simultaneous/independent |
Interpolation |
Linear & Circular |
Least input increment |
0.0001mm |
Input Power supply |
3 phase, AC 415V, 50Hz |
Connected load |
10 KVA |
Table 2 Specifications of end milling machine
Factors |
Symbol |
Unit |
Level-1 |
Level-2 |
Level-3 |
Spindle speed |
A |
rpm |
1000 |
2000 |
3000 |
Feed rate |
B |
mm/min |
500 |
1000 |
1500 |
Depth of cut |
C |
mm |
0.05 |
0.1 |
0.15 |
Table 3 Machining parameters and their levels
The work‒pieces were cleaned by acetone and soapy water after every experimental run before surface roughness test. Figure 2 shows the surface roughness testing machine used during experimentation. The specifications of the surface roughness testing machine includes: traverse speed: 1mm/second, measurement unit: metric/inch, cut‒off values: 0.25mm, 0.80mm, 2.5mm (0.01 in, 0.03 in, 0.1 in), parameters: Ra ,Rq ,Rz (DIN), Ry and Sm , calculation time: less than reversal time or 2 second, whichever is longer. Further, the surface roughness was also measured by the Proscannon‒contact surface profiler having the S5/03 optical sensor (10nm resolution) following BS EN ISO 4288 (1998), BS EN ISO 3274 (1998) and BS EN ISO 4287 (1998).29‒31 The average value of surface roughness was calculated considering 20points along the machining path and each measurement was taken for 300:1 bandwidth and 4mm evaluation length with 0.8mm cut offs. The microstructure study using SEM is conducted on the machined sample surfaces for examining the microscopic defects with and without application of coolant.
Table 4 shows the experimental results and corresponding S/N ratios at each level of the machining parameters. The surface roughness was varied from 1.226 to 2.226µm, the lower feed and higher speed resulted in the better surface finish. (Figure 3) shows the main effect plot for S/N ratio, it reflected that the surface roughness increases with the increment in feed rate, decreases with increment in spindle speed and depth of cut. However, it has been seen that the effect of depth of cut is comparatively smaller on the surface roughness. The normal probability plot (Figure 4) of the residuals shows that the errors are normally distributed. Table 5 is the response table mean S/N ratio for surface roughness and Table 6 is response table for surface roughness mean data. The ranks indicated in Table 5&6 shows the relative importance of each factor in the response. The results of analysis of variance (ANOVA) (Table 7) reflects that the feed (59.84%), spindle speed (29.58%) considerably affects the surface roughnessand depth of cut (9.162%) has an insignificant effect on surface roughness. The results of experimentation clearly reflect that the optimal combination of the machining parameters for surface roughness is found at 3000 rpmspindle speed (A), 500mm/min feed rate (B), and 0.15mm depth of cut (C). Further, for the optimum condition obtained from the analysis, experiments were conducted and surface roughness of the sample was evaluated. (Figure 5) shows the surface roughness plot of the high chromium steel sample for optimum cutting conditions. For the optimum settings, the surface roughness was 1.184µm.
A |
B |
C |
Ra (µm) |
S/N |
1000 |
500 |
0.05 |
1.869 |
-5.43219 |
1000 |
1000 |
0.1 |
2.22 |
-6.92706 |
1000 |
1500 |
0.15 |
2.181 |
-6.77311 |
2000 |
500 |
0.15 |
1.271 |
-2.08633 |
2000 |
1000 |
0.05 |
1.963 |
-5.85841 |
2000 |
1500 |
0.1 |
2.01 |
-6.06608 |
3000 |
500 |
0.1 |
1.226 |
-1.76981 |
3000 |
1000 |
0.15 |
1.671 |
-4.45953 |
3000 |
1500 |
0.05 |
1.99 |
-5.97924 |
Table 4 Experimental results and corresponding S/N ratio
Cutting parameters |
Level-1 |
Level-2 |
Level-3 |
Max-Min |
Rank |
A |
-6.377 |
-4.67 |
-4.07 |
2.307 |
2 |
B |
-3.096 |
-5.748 |
-6.273 |
3.177 |
1 |
C |
-5.757 |
-4.921 |
-4.44 |
1.317 |
3 |
Table 5 Response table mean S/N ratio for surface roughness
Cutting parameters |
Level-1 |
Level-2 |
Level-3 |
Max-Min |
Rank |
A |
3.713 |
3.763 |
3.967 |
0.253 |
1 |
B |
3.893 |
3.763 |
3.787 |
0.13 |
2 |
C |
3.803 |
3.817 |
3.823 |
0.02 |
3 |
Table 6 Response table for surface roughness mean data
Source |
SS |
DF |
MS |
F |
% contribution |
A |
8.6019 |
2 |
4.3009 |
20.9 |
29.58 |
B |
17.4008 |
2 |
8.7004 |
42.28 |
59.84 |
C |
2.6643 |
2 |
1.3322 |
6.47 |
9.162 |
Error |
0.4115 |
2 |
0.2058 |
1.415 |
|
Total |
29.0786 |
8 |
100 |
Table 7 ANOVA for S/N ratios
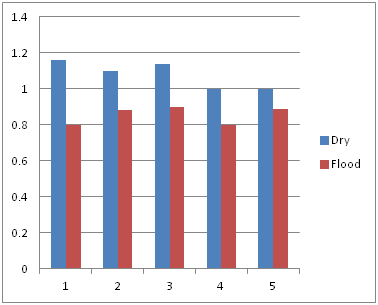
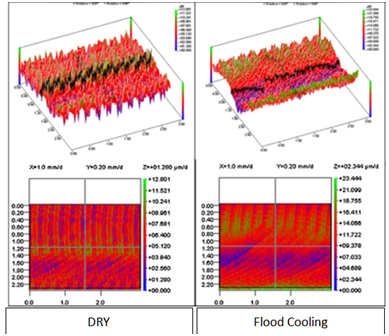
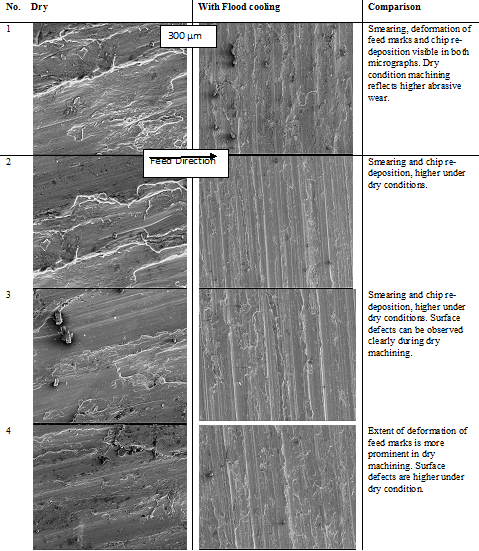
Further, the effect of flood cooling on surface integrity was studied. Five experimental runs (with/without flood cooling) were performed at optimum cutting conditions obtained from Taguchi analysis for further investigate the surface roughness and surface integrity of high chromium steel samples after end milling. (Figure 6) shows a plot of the average surface roughness of machined samples of high chromium steel for optimum conditions, average surface roughness was calculated by measuring the surface roughness of each machined sample at 20 points. The figure clearly shows that the surface roughness of the samples while flood cooling is employed is 20.92% lesser at an average than the dry conditions. Table 8 shows a comparison of SEM micrographs of machined samples. It can be clearly observed by the SEM micrographs that deformation of feed marks, smearing and chip re‒deposition is prevailing for all the samples irrespective of dry machining or machining with flood cooling. During dry machining higher surface defects, deformations of feed marks are observed due to as there is a higher cutting temperature than machining with flood cooling. Likewise, smearing is also more governing in dry machining.It is visible from the SEM micrographs that coolant reduces the surface defects; chip re‒deposition, plastic deformation, smearing, and cleaner cuts are produced with the introduction of coolant. It is evident from SEM micrographs that the machined surfaces chiefly comprise partially irregular pits and longitudinal grooves. The occurrence of grooves shows micro‒ploughing and micro‒cutting effect and the wear mechanism chiefly includes abrasive wear. The pits and prows are also visible in the micrographs which indicate the inclusion of adhesive wear. The microstructure examination concludes frequent abrasive wear with a few traces of adhesive wear. (Figure 7) shows the optical scan of the machined surfaces of high chromium steel sample with/without flood cooling which reflects that widespread plastic deformation has occurred in both dry and flood cooling. The results of optical scan reiterate the results shown by the SEM micrographs.

Figure 6 Average surface roughness (µm) of high chromium steel sample (y axis) Vs experiment run for optimum conditions (x-axis).

Figure 7 Optical scan of the machined surfaces of high chromium steel samples with/without flood cooling.
Comparison of MRR and surface finish using different electrodes in EDM
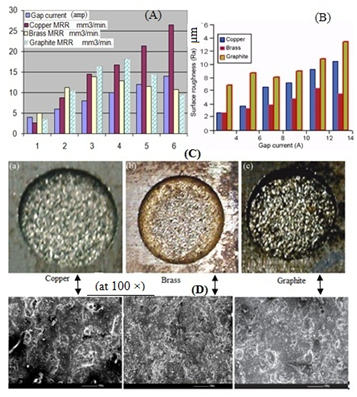
EDM is used for high precision machining of conductive material as a series of electrical discharges causes the removal of material from work‒piece.32‒35. ACNC die sinking EDM (Sparkonix ‒ 25A) shown in Figure 8 is used for the experimentation. (Figure 9A) shows the effect of gap current on MRR for copper, brass and graphite electrodes. It clearly reflects that increasing gap current increases MRR significantly while using copper electrode. The MRR increases 8.66 times when gap current is increased from 4A to 14A whereas for brass electrode MRR increases up to increasing the gap current from 4A to 8A but further the MRR decreases. The brass electrode results in lower in comparison to copper electrode at higher gap current. The graphite electrode results in higher MRR in comparison to brass and the copper electrodes at 8‒10A gap current. The MRR decreases for graphite after 10A for graphite electrodes. (Figure 9B) shows the comparison of surface roughness obtained using different electrodes. The surface roughness increases with an increment in gap current for all electrodes. The brass electrode results in lowest surface roughness among all three electrodes used for experimentation while the graphite electrodes result highest. (Figure 9C) shows the high chromium work‒piece material after machining using EDM at 14A using different electrodes and (Figure 9D) shows SEM Micrograph (at 100×) of transverse surface of high chromium steel machined using different electrodes. The micrographs show the presence of marten site and spherical, ellipsoidal carbides in the structure. The brass electrode machined surface shows different structural features; melting and washing out of the metal is visible but non uniform heat transfer resulted in different material removal pattern. The ligaments were formed during flushing and further broken into the droplets. Some sticking particles are also visible. As high rate of heat transfer is followed by the quenching, an optimized energy balance and transfer of heat is required to avoid cracks. The micrograph of high chromium machined by copper electrode shows the removal of molten mass by sheet or ligament formation as chunk which sometimes gets stuck to the surface due to existence of partial liquid condition. The graphite electrode machined surface micrograph shows heated top surface in solid state whereas bottom surface in partial liquid state. It can be safely concluded that that brass electrode results in superior surface finish with average MRR than copper electrode. Additionally, as shown in (Figure 9A) MRR for brass electrode is higher than copper electrode for current up to 6A and for higher currents the MRR resulted by the use of copper electrode is much higher than brass electrode. The graphite electrode results in cracks and volcanic eruption on the surface due to non uniform heating.

Figure 9 (A) Effect of gap current on MRR for different electrodes in high chromium steel samples (B) Comparison of surface roughness obtained using different electrodes in high chromium steel samples (C) High chromium work material after EDM at 14 A using different electrodes (D) SEM Micrograph of high chromium steel samples (at 100 ×) of transverse surface machined using different electrodes.


Figure 10 Comparison of SEM micrographs of machined samples for optimum cutting parameters (Speed-3000 rpm, Feed rate-500 mm/min, and Depth of cut-0.15mm).
To compare machining of high chromium, using EDM and end milling both the methods have their own advantages and disadvantages. The end milling process is the cost effective, fast, and light milling could be an alternative to EDM. EDM could be used for sharp inside corners, complex geometry, deep and unattended cutting and where the desired surface‒finish is specified.
The production rate with an acceptable quality level is the prime concern during end milling. It was found in the present work at 3000rpm, 500mm/min and 0.15mmdepth of cut minimum surface roughness (1.184µm) is obtained. It can safely be concluded that spindle speed (29.58%) and feed rate (59.84%) have significant effect whereas the depth of cut (9.162%) has lesser effect while minimizing the surface roughness. Surface roughness reduces by 20.92 % at an average while machining with flood cooling. The introduction of coolant reduces the surface defects, chip re‒deposition, smearing and plastic deformation and promotes cleaner cuts. It can be also safely concluded that the machined surface undergoes mostly an abrasive wear but it also experiences adhesive wear up‒to an extent.Further, the effects of machining parameters on recast layer thickness and overcut and cutting forces, material removal rate with the optimum condition can be investigated. For EDM, it can be concluded that copper electrodes result in maximum MRR at high gap current. The brass electrode results in the superior surface finish and average MRR. The graphite electrode results in cracks and volcanic eruption on the surface due to non‒uniform heating. The heat affected zone is also deeper in machining using graphite electrodes. The micrographic analysis of EDM machined work‒pieces could reveal important information and considered as future work. The end milling and EDM both can be employed effectively for different shapes and surface requirements of high chromium steel product. The results can be utilized for better technological and economic implications during EM of high chromium by improving surface finish, reducing the cutting time and tool wear. There are a number of other parameters in the EDM process that can affect the MRR and Ra in addition to discharge current, other variables such as pulse on‒time, pulse off‒time, discharge voltage, dielectric flushing pressure and mode, type of dielectric used which can be considered as future work.
None.
The author declares that there are no conflicts of interest.
None.

©2019 Vedrtnam, et al. This is an open access article distributed under the terms of the, which permits unrestricted use, distribution, and build upon your work non-commercially.