Practical Guide to Common ENT Calls in Hospitals with Special Focus on Epistaxis
Nawal B Dubey
Regret for the inconvenience: we are taking measures to prevent fraudulent form submissions by extractors and page crawlers. Please type the correct Captcha word to see email ID.

Senior ENT surgeon Alrayan Hospital, Bahrain
Correspondence: Nawal Dubey Senior ENT Surgeon Alrayan Hospital East Riffa, Kingdom of Bahrain
Received: July 20, 2017 | Published: August 24, 2017
Citation: Dubey NB (2017) Practical Guide to Common ENT Calls in Hospitals with Special Focus on Epistaxis. J Otolaryngol ENT Res 8(3): 00250. DOI: 10.15406/joentr.2017.08.00250
Download PDF
Table of Contents
- Top Ten Calls Outline
- Pearls
- On the phone (Always ask the patient’s vitals, stability and pertinent labs)
- In the room / What to do
- Prescribe / follow up
- Instructions to the patient
- ENT Ward Stuff Including Current Head and Neck Flap Routines
- Less Common Calls
- Peds Call Hints
- Common Medical Abbreviations
- Survival Drug Pages
These 2 pages are a 6 year experience compilation of the most commonly used surgical drugs, bugs and drugs dosages for adults and kids, Bailey’s textbook antibiotic to diagnosis recommendations and how to bolus various electolytes. There is also a pain meds conversion table
- ENT/Hospital Phone Numbers
Resident, Staff and Common in house numbers. (Please don’t call staff at home unless they specifically tell you to do so. Either page them or call your back up guy.)
A. Top 10 Outside/Emergency C/O Calls
- Epistaxis
- Peritonsillar Abscess
- Sialolithiasis (Salivary Gland Stones)
- Hoarseness
- Otitis Externa
- Stridor
- Head/Neck Abscess
- Post-Op Complications
- Foreign Body in Airway
- Epiglottitis
Epistaxis (Nose Bleeds)
Pearls: (Most are within the body of the text. These are just a few extras)
- 95% of the time ‘posterior bleed’ = poorly packed anterior bleed or at the very worst and mid nasal cavity bleed, both of which are accessible with anterior packing
- The nose is not some mysterious cavern filled with explosive trigger points. There is a septum in the middle (usually, don’t forget that a lot of people have a bent or deviated septum) and turbinates that come off the sides. (see the picture in “what to do”)
- What makes the nose special is its vast blood supply, which also allows the nose to heal very quickly.
- You only have to exceed the blood pressure of whatever vessel is causing trouble. Even the most hypertensive artery can be stopped with a pressure that equals that of pushing an elevator button
- Never use versed or fentanyl in a patient who is not intubated, unless you are about to intubate them yourself!
- Most consults are for patients who have already been packed or are “too complicated” to be packed by less experienced staff
On the Phone
- How much, how often and how long. Are they bleeding right now? Is the Airway OK
- What has been done so far? What’s up the patient’s nose? (They need to do something to control the bleeding.) What is the BP. Hypertension is a poor correlate with degree of bleeding since the vast majority of nose bleeds are Venous
- Hemoglobin. INR. Coumadin, Plavix or other. Always ask if the patient is stable. Tell them to start an IV and give a bolus (if safe for patient – i.e., they’re not in CHF)
In the Room
- Get your supplies ready before you start. All these are in the Emergency and Resident room ENT carts. You’ll need:
- Suction with Fraser tip and tonsillar suckers
- Kidney basin/bowl
- Head-Light (these are in the ENT ER rooms)
- Epistaxis tray (in rooms and 3D4)
- Garbage bin
- 4% Xylo with Otrivin (50/50) mix you make yourself
- Several 4 by 4s, polysporin and tape
- 2 large Merocel sponges and/or 2 Vaseline gauze packs unraveled
- It’s also good to know where your silver nitrate sticks [long plastic matches in a blacked out tube] are located. Most often, by the time the patient is seeing ENT, a simple cautery will not do. It is a great method if there is a small excoriated area that only bleeds occasionally and very briefly. A Few words on cauterization:
- Never cauterize both sides of the septum as you can cause a perforation that way. Instead do one side and then about a month later the other
- I always like to put a little bit of polysporin on there to ward off infection and to help moisturize the area. I also ask the patient to put some in their nose at bed time for about 2 weeks
What to do
- Take out the existing pack. (Most docs won’t call you if their own pack is working ) Always have a Merocel, Vaseline gauze, and your suction handy in case you have to stop a streaker. Also make sure you have access to at least 2 foleys if the bleed is really bad (extremely rare). (See posterior pack section)
- With the headlight on, examine the nasal cavity with the speculum and the oral cavity with the tongue depressor
- There might be a lot of clots/crusts around so try to suction out as much as you can. Some authors advocate having the patient blow their nose
- Try to find the source of the bleeding. It’s often directly on the anterior septum. Also look for septal perforations, mucosal lacerations, polyps, masses (tumors) and foreign bodies. Remember: the top three causes of nose bleeds are:
- Mucosal Dryness
- Digital excavation (nose pickers)
- Anticoagulation agents
- Posterior bleeds are exceedingly rare (despite the conviction of referring MDs). Usually it’s just a poor anterior pack. Also don’t forget that 90% of Epistaxis is VENOUS in origin so unless you see a pumper the BP has little to do with how much they bleed
- Once you’ve visualized the mucosa, gently insert into each nostril a 50/50 soaked 4x4 gauze cut into 1 x 8 inch strips (see asterixes in the below diagram) As long as you soak something in the anaesthetic/vasoconstrictor, you can use a wide variety of things here including:
- Stretched out cotton balls
- Eye patches (tear in ½)
- Neuropatties (full length)
- These are ideal and we use them in the OR, but good luck finding them in the ER

- Leave the local in for at least 5-10 minutes
- If the patient is bleeding very heavily, go ahead and put something in there, to get some degree of control
- While you’re waiting, you can tell the patient what you’ll be doing, or you can get the rest of their story. (Usually, you’re answering another page.)
- Remove the local and re-examine the mucosa. Often, the oozing will be decreased and the mucosa will be more pale due to the Otrivin effect
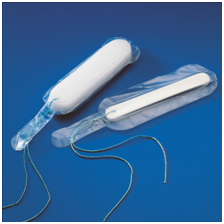
- A recent study done here at the U of A indicated that using Merocel packs was a good first line treatment for Epistaxis, and unless the patient has a severe septal deviation or a big fungating mass, Merocel is an excellent option

The Merocel Method
- Size up the holes. (Nose holes!) A large Merocel will easily fit into a 70y old retired basketball player, but not into a 5 ft tall young Asian female
- Also most people’s nasopharynx is approximately 7-8cm long. That’s why they made the Merocel that long. But you can always trim these things to custom fit the patient. (The trick is to not cut off too much.)
- Apply a generous amount of Polysporinto the leading edge of the Merocel. This will make it a lot easier on the patient. The pt should be sitting up straight with their head against the head rest. (so they don’t move back)
- Gently but firmly glide the Merocel in at a perpendicular angle to the forehead. Remember the hard palate is on a slight decline anteroposteriorly, it is NOT 45 degrees up! Also, try to stay slightly closer to the septum which is less sensitive than the turbinates
- The rule with all packs, whether you use Merocel, Vaseline gauze (see below) or Posteriors, you must pack both sides. Once both packs are in, you can inject the non-bleeding side with Normal Saline (to expand it) if it hasn’t expanded with blood
- Always tie the merocels together, leaving about a centimeter of slack between the nose and the knot. If they’re loose the patient will invariable pull them out “by accident”
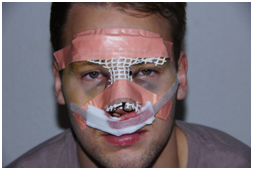
- The final step is applying a “moustache dressing”. You fold a 4 by 4 into thirds and tape it over their nostrils. (see below)

The Vaseline Gauze Method
- This one is more useful in patients which have unusual anatomy (major septal deviation), a bleeding mass or are post op nose procedure bleeds. The reason is that you can custom fit the pack to the necessary defect, something the Merocel will not allow you to do
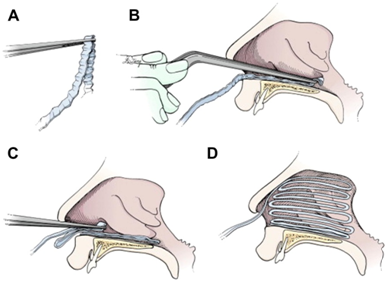
- After you’ve examined and anaesthetized the mucosa with the topicals you’ll be inserting a 6ft long ½ inch strip of really slippery gauze into the nostrils with your forceps. You’ll need at least 2 of these (one per side). I say at least 2 because it is not uncommon to stick up to 30-40 feet of gauze into the really big nasal cavities
- Don’t forget that 1 strip, when packed properly is only about 1.5 cubic inches in dimension so it’s not as big as most people think
- There are 2 important things about Vaseline gauze you need to keep in mind:
- First, It really helps to see where you are layering the stuff. If you keep banging into the turbinates or septum it will bleed and hurt more
- Second, when you layer it, place the strips onto the floor of the nose and gently press each layer into the next so that the whole pack becomes one solid thing. This will ensure that it’s tight enough to stop the bleeding and more importantly that it’s not too loose at the back and starts to hang down the patient’s nasopharynx. If that happens, you have to cut it in their mouth or worse, take it out and re-do the pack since they could swallow or aspirate the thing!
- Once both sides are nicely packed apply a moustache dressing
Posterior Packs
- There are several types of posterior packs and if we’re being technical, a good Merocel on each side is actually a type of posterior pack
- I am describing the “formal” method below in detail, but a very quick & potentially lifesaving way to pack the nasopharynx is to just use two foleys and keep them secured in place with plastic clamps as follows:
- Prepare: two foleys (if you have time to test the ballons do so, otherwise you will be called at 3AM for a leaking foley), prefilled saline syringes, plastic clamps and some 2 by 2s
- Place one in each nostril
- Inflate the balloons (Try not to inflate the balloon to max capacity since they can hold a lot of saline. Instead, size up the patient’s nasopharynx and fill the foleys accordingly) and pull them out until there is moderate resistance. You cannot be timid here, but don’t pull so hard that they slingshot out of the patient’s nose and across the room either!
- At this point you can do an anterior pack with Vaseline gauze (Merocel is not adequate because you have to custom fit that nasal cavity). You have the option to secure the foleys with clamps first, cut the non-clamped portion off and pack the nose OR, pack the nose first while someone gently pulls on the foleys and then clamp them. You have a bit more room with the latter method, but you will need that extra pair of hands.
- Make sure you pad the skin contact points
- Incredibly enough, you are done
- Keep in mind that this one is controversial. In fact we do not routinely do this because it has traditionally been thought to cause mucosal necrosis from the bulb pressure. Despite this, a lot of ENTs use the foleys as posterior packs
- Call your back-up resident for the formal posterior “pack”. This one you need to see. But here are the basics:
- Tighten your sphincter. True posterior bleeds are rare and are usually the results of invasive trauma or some type of tumour back there. This is the definitive pack. The 3 options left if a proper posterior pack is not working are Embolization, Surgery or Death
- Spray the nose and oropharynx with xylocaine spray. Use at least 5 sprays in each hole, varying the direction of spray, but don’t go more than the toxic dose! Again insert the cotton/gauze with local and Otrivin
- Your tray should be prepared ahead of time and should include 2 additional things:
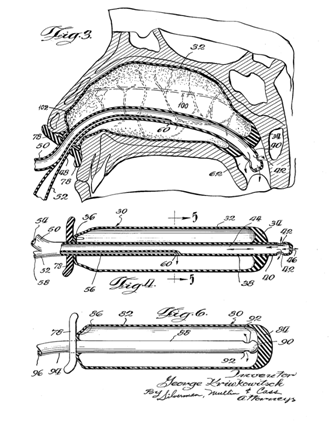
- The Posterior pack itself – this is just a single ‘4 by 4’ sponge folded into thirds. You can also roll up a couple of ‘2 by 2’s, depending on the patient’s head size. See pictures below. (LN = Left Nostril, O. = Oral/Mouth and RN = Right Nostril)
- 2 small foleys
- Once the nose is reasonably anaesthetized, insert a foley into the left nostril and grab the end of it inside the mouth. A bayonet forcep works well for this. Pull it out just enough so you can tie the ‘LN’ suture to its end. Do the same thing on the right side
- When both the sutures are tied on, moisten the pack with polysporin so it’s saturated. (This makes it easier to insert and prevents stinky infection that often happens withing 24-48hrs.)
- Then with your dominant hand holding both foleys out of the nose and the other hand holding the pack at your index and middle finger tips, pull the foleys out while simultaneously pushing the pack behind the uvula/soft palate. (Picture Below)
- It should be snug and you shouldn’t see any of the pack in the back of the mouth
- Now you need to tie the 2 silk sutures to the columella (middle of the nostrils. Make sure you put a rolled ‘2 by 2’ under the knot to prevent necrosis of the suture into the skin
- Remember that the 3rd or middle silk suture has to come out of the patient’s mouth and you need to tape it securely onto their cheek. This is the one you’ll use to pull the pack out usually in 72hrs
- Once tied, you now just pack the nose with Vaseline gauze as above. Don’t use merocels. The gauze is much better once the posterior nose is buttressed. Also you can take pieces of the gauze out each day and once the patient is day with only the posterior pack, it can be d/c’d.
- Patients with posterior packs must be admitted for observation.
- Make sure you order an AM hemoglobin
The final product as seen from side view is below

Perscribe/Follow up:
- Keflex 250-500mg PO QID while the pack is in or
- Cloxacillin500mg PO QID while pack is in
- Tylenol #3 i-ii PO q4h prn x 20pills (Watch out for constipation from codeine, which can lead to straining. Order Colace especially in the elderly)
- RhinarisNasal Spray ii sprays each nostril QID x 1 month once the packs are out
- Polysporin to each nostril at bedtime (this is incredibly important). Tell the patient to sniff up a small glob of the stuff, just enough to cover one fingernail. They should moisturize the nose almost to the point of obstruction
- F/U in 48hrs to pull the packs out. Once pulled, they should Polysporin in their nostrils regularly
Instructions to Pt: Take it easy!!! No straining, heavy lifting or exercise. It also helps if they don’t get stressed for at least 1 week. (Arguing, yelling etc.) They should try to keep their head at 30 - 45 degree angle when supine. Ice packs can constrict some of the vessels
Reassure the patient that this will stop and get better. Let them know it’s the most common problem we see in the ER and everyone gets nosebleeds at some point in time. I often remind patients that in the OR we incise, tear and debride tons of mucosa right off the bone and the bleeding often stops within 4 hours despite all that “trauma”. They need to know that there is light at the end of the tunnel!
Many times the pack doesn’t immediately stop 100% of the bleeding. A tiny amount is ok, especially in the first few hours. But it should stop eventually. A common rule of thumb is as long as the moustache dressing is not getting soaked more than every three hours. Also there shouldn’t be blood pouring in the back of the throat.
Conclusion
So we have seen that epistaxis is a very frequent call for any otolaryngologist and very challenging one too.
Acknowledgments
Conflicts of interest
Author declares there are no conflicts of interest.
Funding

©2017 Dubey. This is an open access article distributed under the terms of the,
which
permits unrestricted use, distribution, and build upon your work non-commercially.


