Journal of
eISSN: 2373-4345


Case Report Volume 13 Issue 4
Master’s in Dentistry from the Federal University of Pernambuco (Brazil), Coordinator of the Lingual Orthodontics courses at the Complementary School of Esthetic Dentistry (ECOE) in São Paulo (Brazil) and Dental School -TMCS, LDA in Porto (Portugal)
Correspondence: Randerson Menezes Cardoso - Avenida Dezessete de Agosto, 335 sala 114 - Parnamirim, Zip Code 52060-590, Recife, Pernambuco, Brazil, Tel 55(81) 999247
Received: November 15, 2022 | Published: November 23, 2022
Citation: Cardoso RM. Digital Ideal Archwire Design (DIAD) in lingual orthodontics: technique update. J Dent Health Oral Disord Ther. 2022;13(4):98-103. DOI: 10.15406/jdhodt.2022.13.00581
The objective of this study was to describe the update of an ideal arch development protocol, through non-dental software, for cases treated with lingual orthodontics, so that the professional can develop arches that provide a pad thin enough to contain the individualization of bracket prescriptions and regularization of the lingual surface of the teeth, regardless of the shape of the arch used - individual arch, straight, mushroom, Christmas or mixed -, providing more comfortable, biological treatments with better mechanical control.
Keywords: aesthetics, biomechanics, invisible orthodontics
Lingual orthodontics emerged in the 1970s with the aim of filling a large aesthetic gap in orthodontic treatments.1–9 Although initially the technique was well accepted; professionals began to criticize its efficiency. Today we already know that the judgments of the past occurred due to the lack of biomechanical knowledge, adequate materials, training of professionals and the high expectations of patients.1,3,4,8,9
With the identification of factors that led professionals at the time to failure, new protocols were introduced, such as indirect bonding and individualization of brackets. Having established criteria, lingual orthodontics began to evolve and gain strength worldwide.1,10,11
Among the various particularities of lingual orthodontics, the composite resin (pad) inserted in the empty spaces (gap) between the lingual surface of the teeth and the base of the brackets deserves attention, because in addition to regulating the anatomical variability of the lingual surface of the teeth, it contains all individualization of prescription of brackets.1,12–15
Despite the mentioned advantages, the pad can provide the following difficulties: reduction of tongue space, reduction of the interbracket distance, increase in the distance from the point of force application to the center of resistance of the tooth, phonetic discomfort, difficulty in cleaning, reduction of resistance to masticatory forces with consequent debonding of brackets, difficulty in removal and reattachment,1,8,15,16 so it is necessary to have a pad thin enough just to regularize the lingual surface of the teeth and to contain the individualization of the prescription of the brackets, regardless of the shape of the arch you want to work with (mushroom, christmas, mixed, mushroom or individualized).1,8,15–24
This article aims to present an update of the DIAD system (Digital Ideal Archwire Design), described in 2019, where it is possible to determine from a virtual model, an ideal arch that provides the smallest pad possible, regardless of shape, ensuring a more comfortable treatment for the patient and with better biomechanical control.
For the DIAD System (Digital Ideal Archwire Design), the virtual SETUP must be used and from there determine the best virtual positioning of the ideal arch, so that it provides the smallest pad possible for the desired arc type (straight arch, mushroom, christmas, mixed or individualized). With this reference, an ideal real or virtual arch will be made (steel wire 0.018” X 0.025”), as well as a template to facilitate the diagramming of the arches to be used throughout the treatment and transfer trays.
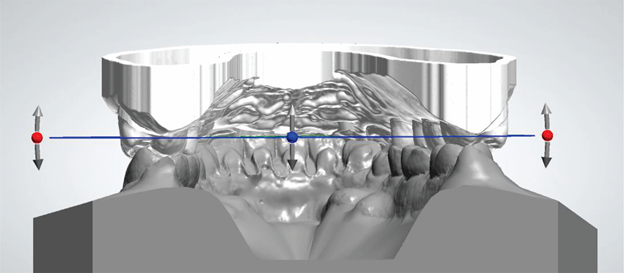
With digital SETUP, or with analog SETUP scanning, the 3Shape 3D Viewer® Software (Copenhagen, Denmark) must be used to determine the location of the cross-section plane in the model. Initially, three points will be marked on the model: an anterior one in the center of the clinical crown of one of the central incisors and two posterior ones, in the center of the clinical crown of the first molars, being: one on the right and another on the left (Figure 1). After marking and creating the plane, the professional needs to determine, through visual assessment, the best location, tilting it anteriorly or posteriorly and moving it more cervically or occlusally (Figure 2), to minimize possible interference when in occlusion (Figure 3).

Figure 3 Virtual evaluations of possible occlusal interferences in the selection of the cross-sectional plane.
With the demarcation and cut of the transverse plane of the digital model, it must be delimited, measuring it on the x and y axis of the Cartesian plane (Figure 4) and transported to CorelDRAW®, Power Point® or Keynote®, where it will be calibrated, by creating an image (rectangle) with the same measurements taken in the 3Shape 3D Viewer® Software (Copenhagen, Denmark) and marked with a red dot in the center of the crown of the lingual surface of all teeth (Figure 5).
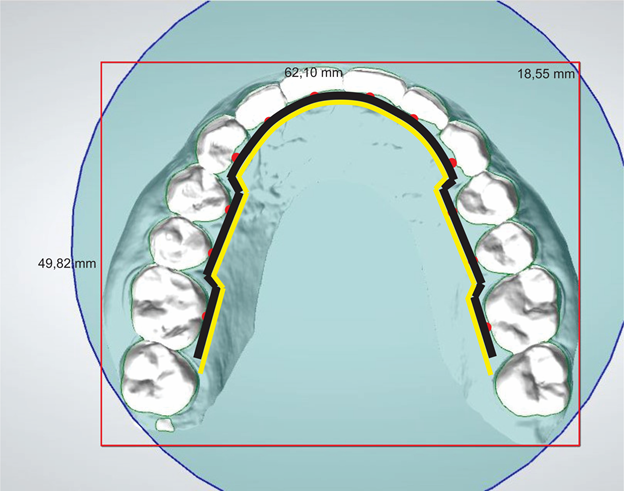
With the calibration of the image and the marking of the points on the lingual surface of the teeth in CorelDRAW®, Power Point® or Keynote®, the professional must outline the shape of the ideal future arch that he wants to work with the help of the drawing tools in the greatest thickness of the in-out of the brackets. The numerical value of the thickness can be defined with the aid of a specimeter, measuring the thickness of the brackets or checking the in-out value in the company's catalog. The space occupied by the line is defined as a safety zone where the future ideal arch will not be able to invade, under penalty of generating premature contact of the bracket base on the lingual surface of the teeth in the process of assembling the appliance (Figure 6).
With the determination of the safety zone, the professional must design a new arc through the aforementioned software, in a way coordinated to the safety zone in the thickness of the depth of the arc to be worked (0.018" x 0.025"), that is, 0.025" (0.635 mm) (Figure 7) This newly designed arch will serve as a template for making the ideal arch, as well as for the different arches used during orthodontic treatment (Figure 8).

Figure 7 Creation of the arch coordinated to the safety zone that will serve as a template for making the ideal arch.
Given the determination of the template, the professional can create the ideal arch in two ways: physical or virtual. The choice will be based on the way the orthodontist wishes to work. If you choose to position the brackets in the setup digitally, the ideal arch must be created virtually. If you want to manually position the brackets, we will create the arch physically with the printout of the full-size template (arc drawn in the previous topic).
With this, we will be able to continue the laboratory phase of bracket assembly. The professional will have two options:
With the assembly of the brackets, we will have to use devices to transfer them precisely to the patient's mouth. According to the chosen way of assembling the brackets, we can create the trays in the following ways:
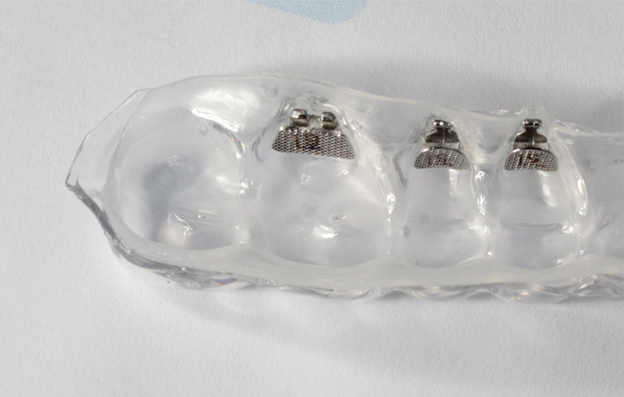
Thermoplastic plates: We will print the setup model with the brackets already positioned virtually (without the arch) to press two plates: the first 1mm in EVA (Ethylene/Vinyl Acetate copolymer) and the second 0.75mm in acetate, to be divided into individual trays (Figure 17 & 18).

Figure 17 Transfer mold made of two overlapping plates: the first of 1mm in EVA (Ethylene/Vinyl Acetate copolymer) and the second of 0.75 mm of acetate.
DIAD transfer tray: We will create the individual transfer trays digitally using the Meshmixer® software so that they can be printed immediately afterwards (Figure 19 & 20).
The success of an orthodontic treatment begins to be obtained even in the laboratory phase with a good ideal arch, as this will serve as a guide for the manufacture of pads, devices that will store all first, second and third order information in the individualization of brackets. The great challenge is to make a pad that has the smallest possible thickness, since the bulky pads compromise comfort, patient adaptation and resistance of the device in terms of masticatory forces.1–15
The protocol most used by professionals in the construction of the ideal arch, advocates the direct and free construction of the arch in the model, being at the mercy of the experience and skill of the professional. Unlike the technique, the DIAD system has a simple and objective protocol that ensures the creation of a pad that is thin enough just to regularize the lingual surface of the teeth and contain the prescription for individualization of brackets in a precise and predictable way.1,5,6,12,21
The update of the Digital Ideal Archwire Design (DIAD) protocol increases the precision of the laboratory procedures in the making of the referred arch due to two factors: 1) creation of the Safety Zone - the virtual design carried out in the in-out thickness of the brackets to be used eliminates possible premature contacts between the bracket base and the lingual surface of the teeth in the appliance assembly process described in item 6, since in the protocol described above, the space that fulfilled this same function was static at a thickness of 0.025”, that is, 0.635 mm. In the process described above, the ideal archwire would have to undergo adjustments when the professional worked with brackets thicker than the former relief space (0.635 mm), to eliminate premature contacts. Currently, the difficulty has been solved, because now the Safety Zone is no longer static, its thickness will be directly linked to the in-out thickness of the brackets to be used; 2) digitalization of the workflow: it opens up the possibility for the professional to carry out the entire process of building the ideal arch, positioning the brackets, making the pads and making the transfer trays virtually, eliminating human bias in the laboratory construction process from the ideal arch to the transfer trays. Although the system allows the professional to choose the degree of digitalization in the DIAD protocol that he wants to work with, the more we virtualize this process, the lower the chances of the incorporation of unwanted torque in the manipulation of the arches, excess or deficiency of resin in the pads, or fractures of the Kommon Base's fingers. Despite the mentioned advantages, it is important that the professional has a minimum knowledge of computers to work with all the virtual / real interfaces in the process of developing the archwires, positioning the brackets and printing the trays.
When compared to other techniques of digital design of the ideal arc, through software, the DIAD system stands out for its simplicity, effectiveness and low cost in determining the ideal arc shape, since the entire process can be performed with free software.26
None.
The author declares no conflicts of interest.

©2022 Cardoso. This is an open access article distributed under the terms of the, which permits unrestricted use, distribution, and build upon your work non-commercially.