Custom-made post and core - part I: technique to fabricate direct custom-made post with resin pattern
Mohamed Abdelmageed Awad,1,2
Regret for the inconvenience: we are taking measures to prevent fraudulent form submissions by extractors and page crawlers. Please type the correct Captcha word to see email ID.

Haifa Saleh Abdulghaffar3
1Fixed Prosthodontic Department, Faculty of Dentistry, Tanta University, Egypt
2Fixed Prosthodontic Division, Faculty of Dentistry, King Abdulaziz University, KSA
3MOH, King Fahd General Hospital, Dental Center, Saudi Arabia
Correspondence: Mohamed Abdelmageed Awad, Fixed Prosthodontic Department, Faculty of Dentistry, Tanta University, Post Code 33111; Tanta, Egypt, Tel 2-01003836121
Received: May 27, 2014 | Published: July 17, 2014
Citation: Awad MA, Abdulghaffar HS. Custom-made post and core - part I: technique to fabricate direct custom-made post with resin pattern. J Dent Health Oral Disord Ther. 2014;1(3):54-55. DOI: 10.15406/jdhodt.2014.01.00013
Download PDF
Abstract
A simple technique is described to facilitate the fabrication of a direct custom-made post quickly and easily. This is achieved by the injection of mixed resin pattern into a prepared root canal using a special delivery tip and gun.
Keywords:custom post and core, pattern resin, injectable technique
Text
The use of custom-made posts is usually accomplished in canals that have a non-circular cross section or extreme taper. Enlarging canals to a pre-formed post may lead to root weakening and perforation. The quick fabrication and exact fitting of custom-made posts is the aim of fixed prosthodontic clinicians. Fabricating the resin pattern in vivo by the bead-brush technique1 may lose time and effort for the dentist.
The resin injection technique facilitates and eases fabrication of custom-made posts. This is achieved by using a special delivery tip and gun as manufactured for 3M ESPE Vitremer glass ionomer restorative material (3M ESPE dental products, D-82229 Seefeld, Germany) (Figure 1). Resin is mixed and loaded into the delivery tip and the gun is used to inject the resin material into the post space.

Figure 1 Delivery tip, piston and gun used for injection of resin into root canal.
Procedure
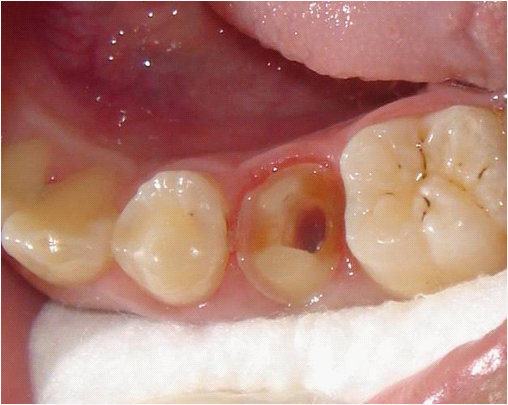
- Remove gutta percha from coronal two-thirds of the root leaving the apical 4-5mm of the canal as in the usual procedure. The remaining coronal tooth structure is prepared for the extracoronal restoration as though it was undamaged. Undermined enamel and thin dentin walls are reduced (Figure 1).
- Shape the canal as needed to remove undercuts. This can be accomplished by using endodontic hand instruments or Peeso-Reamers. Lubricate the canal with petroleum jelly.
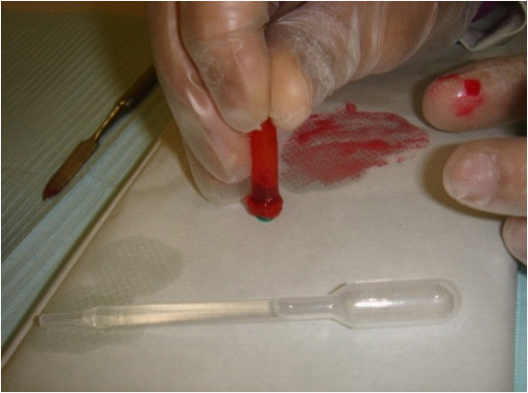
- Mix the resin’s powder and liquid on a glass slab (Figure 2), load the mix into the back of delivery tip manufactured for 3M ESPE, by pressing the back of delivery tip over the mixed resin. Try to reduce entrapped air as much as possible (Figure 3).
- Stand piston point up on the clean part of the glass slab. Push the filled tip over the piston until the piston is fully inserted (Figure 4). Clean any excess resin around the back of delivery tip using tissue.
- Raise the lever on the 3M ESPE restorative dispenser handle, manufactured for 3M ESPE Vitremer glass ionomer restorative material. Withdraw the plunger slightly insert the loaded delivery tip into the barrel of the dispenser and push the plunger forward.
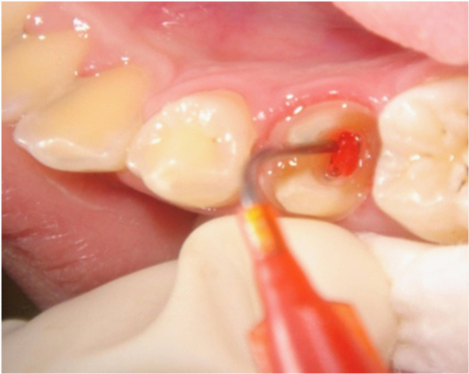
- Insert the pointed part of delivery tip as deep as possible into the canal and squeeze resin material with slow, steady pressure while slowly pulling the tip out of the canal until the excess material over flows out the root canal (Figure 5).
- Rapidly insert the plastic post into the center of the filled resin, push it as deep as possible into the canal and turn it half-round to grip the resin material. Remove excess material outside the root canal and wait for the initial polymerization (Figure 6).
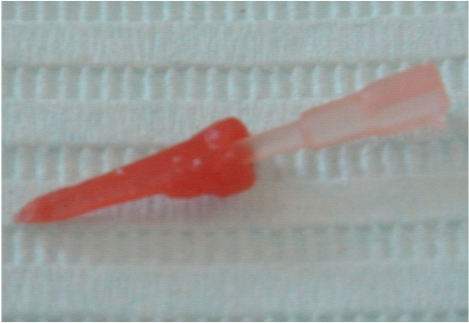
- Remove the custom made post from the canal (Figure 7) and reinsert it again to the same position to check the fit.
- Continue core build up.

Figure 2 The post canal and external tooth surface are prepared. Any undermined enamel is removed.

Figure 3 Mix the powder and liquid of the resin pattern and load the mix into back of delivery tip.

Figure 4 Piston is loaded into the tip to prevent leakage of resin from the loading tip.

Figure 5 Inject mixed resin into the root canal.

Figure 6 Plastic post inserted into the center of injected resin.

Figure 7 Custom-made post after removal from the canal, ready for core buildup.
Summary
This injectable technique is described to fabricate custom made posts quickly and easily. A special delivery tip is used to inject pattern resin into the prepared canal.
Acknowledgements
Conflict of interest
The author declares that there is no conflict of interest.
References

©2014 Awad, et al. This is an open access article distributed under the terms of the,
which
permits unrestricted use, distribution, and build upon your work non-commercially.


